Building an Event-Driven Reactive Asynchronous System with Spring Boot and Kafka
Building an event-driven Reactive Asynchronous System
Spring Boot provides a new strategy for application development with the Spring Framework. It enables you to focus only on the application’s functionality rather than on Spring meta configuration, as Spring Boot requires minimal to zero configuration in the Spring application.
This article will show you how to build a sample project that demonstrates how to create a real-time streaming application using event-driven architecture, Spring Cloud Stream, Spring Boot, Apache Kafka, and Spring Netflix Eureka.
Architecture

Here, Netflix Hystrix has been used to implement the circuit breaker pattern and the API Gateway proxy has been configured using Netflix Zuul.
To get started, create an application with three microservices: Account, Customer, and Notification. Whenever you create a customer record or create an account for a customer, a notification service sends an email and a mobile notification.
All three decoupled services—Account, Customer, and Notification—are independently deployable applications. The Account service can be used to create, read, update, and delete customer accounts. It also sends a message to the Kafka topic when a new account is created.
Similarly, the Customer service is used to create, read, update, and delete a customer in the database. It sends a message to the Kafka topic when a new customer is created, and the Notification service sends email and SMS notifications. The Notification service listens on topics from incoming customer and account messages and then processes these messages by sending notifications to the given email and mobile.
The Account and Customer microservices have their own H2 database, and the Notification service uses MongoDB. In this application, you’ll use the Spring Cloud Stream module to provide abstract messaging mechanisms; it is a framework for building event-driven microservice applications.
This example also uses the edge service for API Gateway using Netflix Zuul. Zuul is a JVM-based router and is also used as server-side load balancer by Netflix. Spring has a strong bonding with Netflix Zuul and provides a Spring Cloud Netflix Zuul module.
Introducing Spring Cloud Streaming
Spring Cloud Stream is a framework for building message-driven microservice applications. It abstracts away the message producer and consumer code from message broker-specific implementations. Spring Cloud Stream provides input and output channels for servicing communications to the outside world. It provides the message broker’s connectivity to the Spring Cloud Stream. Message brokers, such as Kafka and RabbitMQ, can be easily added by injecting a binding dependency to the application code.
Here’s the Maven dependency for Spring Cloud Stream:
<dependency>

<groupId>org.springframework.cloud</groupId>

<artifactId>spring-cloud-stream-reactive</artifactId>

</dependency>
In the above Maven dependency, you have the Spring Cloud Stream dependency reactive model. Now to enable the application to connect with the message broker, use the following code:
@EnableBinding(NotificationStreams.class)

public class StreamsConfig {

}
Here, the @EnableBinding annotation is used to enable connectivity between the application and message broker. This annotation takes one or more interfaces as parameters; in this case, you have passed the NotificationStreams interface as a parameter:
public interface NotificationStreams {

String INPUT = "notification-in";

String OUTPUT = "notification-out";

@Input(INPUT)

SubscribableChannel subscribe();

@Output(OUTPUT)

MessageChannel notifyTo();

}
As you can see, the interface declares input and/or output channels. This is your custom interface in this example, but you can also use other interfaces provided by Spring Cloud Stream:
- Source: This interface can be used for an application that has a single outbound channel
- Sink: This interface can be used for an application that has a single inbound channel
- Processor: This interface can be used for an application that has both an inbound and an outbound channel
In the preceding code, the @Input annotation is used to identify an input channel. Using this identifier, it receives a message, which enters the application. Similarly, the @Output annotation is used to identify an output channel; using this identifier, published messages leave the application.
The @Input and @Output annotations take the name parameter as a channel name; if a name is not provided, then the name of the annotated method will be used by default. In this application, Kafka is used as a message broker.
Adding Kafka to your application
Apache Kafka is a publish-subscribe-based high-performance and horizontally scalable messaging platform. Developed by LinkedIn, it is fast, scalable, and distributed by design. Spring Cloud Stream supports binder implementations for Kafka and RabbitMQ. First, you have to install Kafka in your machine.
Installing and running Kafka
Download Kafka from https://kafka.apache.org/downloads and untar it using the following commands:
> tar -xzf kafka_2.12-1.1.0.tgz

> cd kafka_2.12-1.1.0
Now start ZooKeeper and Kafka on Windows:
> bin\windows\zookeeper-server-start.bat configzookeeper.properties

> bin\windows\kafka-server-start.bat configserver.properties
You can start ZooKeeper and Kafka on Linux using the following commands:
> bin/zookeeper-server-start.sh config/zookeeper.properties

> bin/kafka-server-start.sh config/server.properties
After starting Kafka on your machine, add the Kafka Maven dependency in your application:
<dependency>

<groupId>org.springframework.cloud</groupId>

<artifactId>spring-cloud-stream-binder-kafka</artifactId>

</dependency>

<dependency>

<groupId>org.springframework.cloud</groupId>

<artifactId>spring-cloud-stream-binder-kafka-streams</artifactId>

</dependency>
Here, Spring Cloud Stream and Kafka binder is already added. After adding these dependencies, set the configuration properties for Kafka.
Configuration properties for Kafka
Here is the application.yml configuration file for a microservice:
spring:

  application:

    name: customer-service

  cloud:

    stream:

      kafka:

        binder:

          brokers:

          - localhost:9092

      bindings:

          notification-in:

            destination: notification

            contentType: application/json

          notification-out:

            destination: notification

            contentType: application/json
This file configures the address of the Kafka server to connect to, and the Kafka topic used for both the inbound and outbound streams in your code. The contentType properties tell Spring Cloud Stream to send or receive your message objects as strings in the streams.
Service used to write to Kafka
The following service class is responsible for writing to Kafka in your application:
@Servicepublic class NotificationService {


 private final NotificationStreams notificationStreams;


 public NotificationService(NotificationStreams notificationStreams) {

  super();

  this.notificationStreams = notificationStreams;

 }


 public void sendNotification(final Notification notification) {

  MessageChannel messageChannel = notificationStreams.notifyTo();

  messageChannel.send(MessageBuilder.withPayload(notification)

    .setHeader(MessageHeaders.CONTENT_TYPE, MimeTypeUtils.APPLICATION_JSON)

    .build());

 }

}
The sentNotification() method uses an injected NotificationStreams object to send messages represented by the Notification object in your application. Now look at the following Controller class, which will trigger sending the message to Kafka.
Rest API controller
Here’s a Rest Controller class that you can use to create a REST API endpoint. This controller will trigger sending a message to Kafka using the NotificationService Spring Bean:
@RestController

public class CustomerController {

...

@Autowired

CustomerRepository customerRepository;

@Autowired

AccountService accountService;

@Autowired

NotificationService notificationService;

@PostMapping(value = "/customer")

public Customer save (@RequestBody Customer customer){

Notification notification = new Notification("Customer is created", "admin@dineshonjava.com", "9852XXX122");

notificationService.sendNotification(notification);

return customerRepository.save(customer);

}

...

...

}
The preceding Controller class of Customer service has a dependency with NotificationService. The save() method is responsible for creating a customer in the corresponding database; it creates a notification message using the Notification object and sends it to Kafka using the sendNotification() method of NotificationService. Here’s another side of how Kafka listens to this message using the topic name notification.
Listening to a Kafka topic
Create a listener NotificationListener class that will be used to listen to messages on the Kafka notification topic and send email and SMS notifications to the customer:
@Component

public class NotificationListener {

@StreamListener(NotificationStreams.INPUT)

public void sendMailNotification(@Payload Notification notification) {

System.out.println("Sent notification to email: "+notification.getEmail()+" Message: "+notification.getMessage());

}

@StreamListener(NotificationStreams.INPUT)

public void sendSMSNotification(@Payload Notification notification) {

System.out.println("Notified with SMS to mobile: "+notification.getMobile()+" Message: "+notification.getMessage());

}

}
The NotificationListener class has two methods: sendMailNotification() and sendSMSNotification(). These methods will be invoked by Spring Cloud Stream with every new Notification message object on the Kafka notification topic. These methods are annotated with @StreamListener. This annotation makes the method listener receive events for stream processing.
This article doesn’t have the complete code for this event-driven application; you can find the complete code in the GitHub repository at https://github.com/PacktPublishing/Mastering-Spring-Boot-2.0.
Now run this application to test how the event-driven microservice works. First, ensure that you run Kafka and Zookeeper. The Kafka server will be run at http://localhost:9092.
Now run EurekaServer, ApiZuulService, AccountService, CustomerService, and NotificationService. Open Eureka dashboard on the browser:

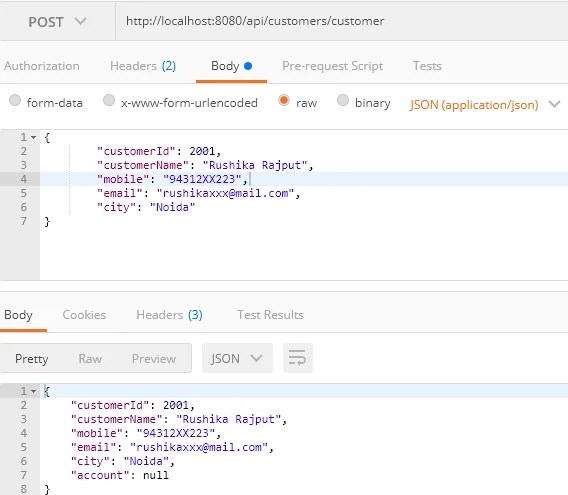
All services are running now; create a Customer object to trigger the event to Kafka. Here, Postman is used as a REST client. See the following diagram, where you created a new customer using the http://localhost:8080/api/customers/customer API endpoint through Zuul API Gateway:

You have entered a new customer record in the database. Whenever a new customer is created, it will trigger a message to Kafka to send email and SMS notifications using the Notification microservice. See the following console output of the Notification microservice:

You have created a new customer using the Customer service, which will trigger a notification to be sent to the customer using the Kafka broker. It is a message-driven asynchronous call. Similarly, whenever you create an account record for a new customer, Kafka will listen for another new notification message for the account creation:
Now verify the console of the Notification microservice:

You have successfully created an account record for the customer, which has triggered a message to Kafka to send email and SMS notifications to the customer. You can check the customer record for this customer by visiting http://localhost:8080/api/customers/customer/2001:

As you can see, the customer has complete information including an associated account object.
You’ve now learned to create an event-driven microservice using the Spring Cloud Stream, Kafka Event Bus, Spring Netflix Zuul, and Spring Discovery services.
If you found this article interesting, you can explore Dinesh Rajput’s Mastering Spring Boot 2.0 to learn how to develop, test, and deploy your Spring Boot distributed application and explore various best practices. This book will address challenges related to power that come with Spring Boot’s great configurability and flexibility.
Creating Queues for In-Order Executions With JavaScript by using WeakMap()
A queue is a programming construct that bears a heavy resemblance to real-world queues, for example, a queue at the movie theater, ATMs, or the bank. Queues, as opposed to stacks, are first-in-first-out (FIFO), so whatever goes in first comes out first as well. This is especially helpful when you would like to maintain data in the same sequence in which it flows.
Types of queues
Before you understand queues, take a quick look at the types of queues that you may want to use in your applications:
- Simple queue: In a simple FIFO queue, the order is retained and the data leaves in the same order in which it comes in
- Priority queue: A queue in which the elements are given a predefined priority
- Circular queue: Similar to a simple queue, except that the back of the queue is followed by the front of the queue
- Double ended queue(Dequeue): Similar to the simple queue but can add or remove elements from either the front or the back of the queue
Implementing APIs
Implementing an API is never as easy as it seems. When making generic classes, you can never predict what kind of situation your queue is going to be used in. Some of the most common operations that you can add to the queue are as follows:
- add(): Pushes an item to the back of the queue
- remove(): Removes an item from the start of the queue
- peek(): Shows the last item added to the queue
- front(): Returns the item at the front of the queue
- clear(): Empties the queue
- size(): Gets the current size of the queue
Creating a queue
Of the four types of queues discussed earlier, this article will teach you to implement a simple and priority queue.
A simple queue
To create a queue, use the following steps:
- Define a constructor():
class Queue {

    constructor() {


    }

}
- Use WeakMap()for in-memory data storage:
const qKey = {};

    const items = new WeakMap();


    class Queue {

        constructor() {


        }

    }
- Implement the methods described previously in the API:
var Queue = (() => {

    const qKey = {};

    const items = new WeakMap();

    class Queue {
        constructor() {
            items.set(qKey, []);
        }
        add(element) {
            let queue = items.get(qKey);
            queue.push(element);
        }
        remove() {
            let queue = items.get(qKey);
            return queue.shift();
        }
        peek() {
            let queue = items.get(qKey);
            return queue[queue.length - 1];
        }
        front() {
            let queue = items.get(qKey);
            return queue[0];
        }
        clear() {
            items.set(qKey, []);
        }
        size() {
            return items.get(qKey).length;
        }
    }
    return Queue;
})();
You need to wrap the entire class inside an IIFE because you don’t want to make Queue items accessible from the outside:

Testing a simple queue
To test this queue, you can simply instantiate it and add/remove some items to/from the queue:
var simpleQueue = new Queue();

simpleQueue.add(10);

simpleQueue.add(20);


console.log(simpleQueue.items); // prints undefined


console.log(simpleQueue.size()); // prints 2


console.log(simpleQueue.remove()); // prints 10


console.log(simpleQueue.size()); // prints 1


simpleQueue.clear();


console.log(simpleQueue.size()); // prints 0
As you can see in above code, all the elements are treated the same. Irrespective of the data they contain, elements are always treated in a FIFO fashion. Although that is a good approach, sometimes you may need something more: the ability to prioritize elements that are coming in and leaving the queue.
Priority Queue
A priority queue is operationally similar to a simple queue, that is, they support the same API, but there is a small addition to the data they hold. Along with the element (your data), they can also persist a priority, which is just a numerical value indicating the priority of your element in the queue.
Addition or removal of these elements from the queue is based on priority. You can either have a minimum priority queue or a maximum priority queue, to help establish whether you are adding elements based on increasing priority or decreasing priority. Now let’s see how we can use the add() method in the simple queue:
add(newEl) {
    let queue = items.get(pqkey);
    let newElPosition = queue.length;
    if(!queue.length) {
        queue.push(newEl);
        return;
    }
    for (let [i,v] of queue.entries()) {
        if(newEl.priority > v.priority) {
             newElPosition = i;
             break;
        }
    }
    queue.splice(newElPosition, 0, newEl);
}
Since you are accounting for the priority of the elements while they are being inserted into the stack, you do not have to concern yourself with priority while you remove elements from the queue. So, the remove() method is the same for both simple and priority queues. Other utility methods, such as front(), clear(), peek(), and size(), have no correlation with the type of data that is being saved in the queue, so they remain unchanged as well.
A smart move while creating a priority queue would be to optimize your code and decide whether you would like to determine the priority at the time of addition or removal. That way, you are not over calculating or analyzing your dataset at each step.
Testing a priority queue
First set up the data for testing the queue:
var priorityQueue = new PriorityQueue();


priorityQueue.add({ el : 1, priority: 1});


// state of Queue

// [1]

//  ^


priorityQueue.add({ el : 2, priority: 2});


// state of Queue

// [2, 1]

//  ^


priorityQueue.add({ el : 3, priority: 3});


// state of Queue

// [3, 2, 1]

//  ^


priorityQueue.add({ el : 4, priority: 3});


// state of Queue

// [3, 4, 2, 1]

//     ^


priorityQueue.add({ el : 5, priority: 2});


// state of Queue

// [3, 4, 2, 5, 1]

//           ^
Visually, the preceding steps would generate a queue that looks as follows:

Note how when you add an element with a priority 2 it gets placed ahead of all the elements with priority 1:
priorityQueue.add({ el : 6, priority: 1});


// state of Queue

// [3, 4, 2, 5, 1, 6]

//                 ^
And when you add an element with priority 1 (lowest), it gets added to the end of the queue:

In the above image, by adding the last element apply the lowest priority in the order, which makes it the last element of the queue, thus keeping all the elements ordered based on priority.
Now, remove the elements from the queue:
console.log(priorityQueue.remove());


// prints { el: 3, priority: 3}


// state of Queue

// [4, 2, 5, 1, 6]


console.log(priorityQueue.remove());


// prints { el: 4, priority: 3 }


// state of Queue

// [2, 5, 1, 6]


console.log(priorityQueue.remove());


// prints { el: 2, priority: 2 }


// state of Queue

// [5, 1, 6]


priorityQueue.print();


// prints { el: 5, priority: 2 } { el: 1, priority: 1 } { el: 6, priority: 1 }
There you have it: the creation of simple and priority queue in JavaScript using WeakMap().
If you found this article interesting, you can explore Kashyap Mukkamala’s Hands-On Data Structures and Algorithms with JavaScript to increase your productivity by implementing complex data structures and algorithms. This book will help you gain the skills and expertise necessary to create and employ various data structures in a way that is demanded by your project or use case.
Building the KNN algorithm With JavaScript
k-Nearest Neighbor (KNN)
The KNN is a simple, fast, and straightforward classification algorithm. It is very useful for categorized numerical datasets, where the data is naturally clustered. It will feel similar in some ways to the k-means clustering algorithm; with the major distinction being that k-means is an unsupervised algorithm while KNN is a supervised learning algorithm.
If you wish to perform a KNN analysis manually, here’s how it should go: first, plot all your training data on a graph and label each point with its category or label. When you wish to classify a new, unknown point, put it on the graph and find the k closest points to it (the nearest neighbors).
The number k should be an odd number in order to avoid ties; three is a good starting point, but some applications will need more and some can get away with one. Report whatever the majority of the k nearest neighbors is classified, as that will be the result of the algorithm.
Finding the k nearest neighbors to a test point is straightforward, but you can use some optimizations if your training data is very large. Typically, when evaluating a new point, you would calculate the Euclidean distance (the typical, high school geometry distance measure) between your test point and every other training point, and sort them by distance. This algorithm is quite fast because the training data is generally not more than 10,000 points or so.
If you have many training examples (in the order of millions) or you really need the algorithm to be lightning-fast, there are two optimizations you can make. The first is to skip the square root operation in the distance measure and use the squared distance instead. While modern CPUs are very fast, the square root operation is still much slower than multiplication and addition, so you can save a few milliseconds by avoiding the square root.
The second optimization is to only consider points within some bounding rectangle of distance to your test point; for instance, only consider points within +/- 5 units in each dimension from the test point’s location. If your training data is dense, this optimization will not affect the results but will speed up the algorithm because it will avoid calculating distances for many points.
The following is the KNN algorithm as a high-level description:
- Record all training data and their labels
- Given a new point to evaluate, generate a list of its distances to all training points
- Sort the list of distances in the order of closest to farthest
- Throw out all but the knearest distances
- Determine which label represents the majority of your knearest neighbors; this is the result of the algorithm
A more efficient version avoids maintaining a large list of distances that need to be sorted by limiting the list of distances to k items. Now get started with your implementation of the KNN algorithm.
Building the KNN algorithm
Since the KNN algorithm is quite simple, you can build your own implementation:
- Create a new folder and name it Ch5-knn.
- Add the following jsonfile to the folder. Here, you have added a dependency for the jimp library, which is an image processing library:
{

"name": "Ch5-knn",

"version": "1.0.0",

"description": "ML in JS Example for Chapter 5 - k-nearest-neighbor",

"main": "src/index.js",

"author": "Burak Kanber",

"license": "MIT",

"scripts": {

"build-web": "browserify src/index.js -o dist/index.js -t [ babelify --presets [ env ] ]",

"build-cli": "browserify src/index.js --node -o dist/index.js -t [ babelify --presets [ env ] ]",

"start": "yarn build-cli && node dist/index.js"

},

"dependencies": {

"babel-core": "^6.26.0",

"babel-plugin-transform-object-rest-spread": "^6.26.0",

"babel-preset-env": "^1.6.1",

"babelify": "^8.0.0",

"browserify": "^15.1.0",

"jimp": "^0.2.28"

}

}
- Run the yarn installcommand to download and install all the dependencies and then create subfolders called src, dist, and files.
- Inside the srcfolder, create an js file and a knn.js file.
You will also need a data.js file. For these examples, a larger dataset has been used which is difficult to be printed here, so you should take a minute to download the Ch5-knn/src/data.js file from GitHub. You can also find the complete code for this article at https://github.com/PacktPublishing/Hands-On-Machine-Learning-with-JavaScript/tree/master/Chapter05/Ch5-knn.
- Start with the jsfile. You’ll need a distance-measuring function. Add the following to the beginning of knn.js:
/**

 * Calculate the distance between two points.

 * Points must be given as arrays or objects with equivalent keys.

 * @param {Array.<number>} a

 * @param {Array.<number>} b

 * @return {number}

 */

const distance = (a, b) => Math.sqrt(

    a.map((aPoint, i) => b[i] - aPoint)

        .reduce((sumOfSquares, diff) => sumOfSquares + (diff*diff), 0)

);
If you really need a performance optimization for your KNN implementation, this is where you might omit the Math.sqrt operation and return just the squared distance. However, since this is such a fast algorithm by nature, you need to do this only if you’re working on an extreme problem with a lot of data or with very strict speed requirements.
- Next, add the stub of your KNN class. Add the following to js, beneath the distance function:
class KNN {
constructor(k = 1, data, labels) {
this.k = k;
this.data = data;
this.labels = labels;

    }
}
export default KNN;
The constructor accepts three arguments: the k or the number of neighbors to consider when classifying your new point, the training data split up into the data points alone, and a corresponding array of their labels.
- Next, you need to add an internal method that considers a test point and calculates a sorted list of distances from the test point to the training points. You can call this a distance map. Add the following to the body of the KNN class:
generateDistanceMap(point) {


const map = [];

let maxDistanceInMap;


for (let index = 0, len = this.data.length; index < len; index++) {


const otherPoint = this.data[index];

const otherPointLabel = this.labels[index];

const thisDistance = distance(point, otherPoint);


/**

         * Keep at most k items in the map.

         * Much more efficient for large sets, because this

         * avoids storing and then sorting a million-item map.

         * This adds many more sort operations, but hopefully k is small.

         */

if (!maxDistanceInMap || thisDistance < maxDistanceInMap) {


            // Only add an item if it's closer than the farthest of the candidates

            map.push({

                index,

                distance: thisDistance,

                label: otherPointLabel

            });


            // Sort the map so the closest is first

            map.sort((a, b) => a.distance < b.distance ? -1 : 1);


            // If the map became too long, drop the farthest item

if (map.length > this.k) {

                map.pop();

            }


            // Update this value for the next comparison

            maxDistanceInMap = map[map.length - 1].distance;


        }

    }


return map;

}
This method could be easier to read, but the simpler version is not efficient for very large training sets. What you’re doing here is maintaining a list of points that might be the KNNs and storing them in map.
By maintaining a variable called maxDistanceInMap, you can loop over every training point and make a simple comparison to see whether the point should be added to your candidates’ list. If the point you’re iterating over is closer than the farthest of your candidates, you can add the point to the list, re-sort the list, remove the farthest point to keep the list small, and then update mapDistanceInMap.
If that sounds like a lot of work, a simpler version might loop overall points, add each one with its distance measurement to the map, sort the map, and then return the first k items. The downside of this implementation is that for a dataset of a million points, you’d need to build a distance map of a million points and then sort that giant list in memory.
In your version, you only ever hold k items as candidates, so you never need to store a separate million-point map. Your version does require a call to Array.sort whenever an item is added to the map. This is inefficient in its own way, as the sort function is called for each addition to the map. Fortunately, the sort operation is only for k items, where k might be something like 3 or 5.
The computational complexity of the sorting algorithm is most likely O(n log n) (for a quicksort or mergesort implementation), so it only takes about 30 data points for the sophisticated version to be more efficient than the simple version when k = 3, and for k = 5, this happens at around 3,000 data points. However, both versions are so fast that for a dataset smaller than 3,000 points, you won’t notice the difference.
- Finally, tie the algorithm together with the predict The predictmethod must accept a test point, and at the very least, return the determined label for the point. You can also add some additional output to the method and report the labels of the k nearest neighbors as well as the number of votes each label contributed. Add the following to the body of the KNN class:
predict(point) {


const map = this.generateDistanceMap(point);

const votes = map.slice(0, this.k);

const voteCounts = votes

// Reduces into an object like {label: voteCount}

.reduce((obj, vote) => Object.assign({}, obj, {[vote.label]: (obj[vote.label] || 0) + 1}), {})

    ;

const sortedVotes = Object.keys(voteCounts)

        .map(label => ({label, count: voteCounts[label]}))

        .sort((a, b) => a.count > b.count ? -1 : 1)

    ;


return {

label: sortedVotes[0].label,

voteCounts,

votes

};


}
This method requires a little bit of datatype juggling in JavaScript but is simple in concept. First, generate your distance map using the method you just implemented. Then, remove all data except for the k nearest points and store that in a votes variable. If you’re using 3 as k, then votes will be an array of length three.
Now that you have your k nearest neighbors, you need to figure out which label represents the majority of the neighbors. You can do this by reducing your votes array into an object called voteCounts. To get a picture of what you want voteCounts to look like, imagine that you’re looking for the three nearest neighbors and the possible categories are Male or Female. The voteCounts variable might look like this: {“Female”: 2, “Male”: 1}.
The job is still not done, however—after reducing your votes into a vote-count object, you still need to sort that and determine the majority label. You can do this by mapping the vote counts object back into an array and then sorting the array based on vote counts.
There are other ways to approach this problem of tallying votes; any method you can think of will work, as long as you can return the majority vote at the end of the day. That’s all you need to do in the knn.js file. The algorithm is complete, requiring fewer than 70 lines of code.
Now set up your index.js file and get ready to run some examples. Remember that you need to download the data.js file first. You can do this by downloading the file from https://github.com/bkanber/MLinJSBook. Now add the following to the top of index.js:
import KNN from'./knn.js';

import {weight_height} from'./data.js';
You can now try out the algorithm using a simple example.
Example – Height, weight, and gender
KNN, like k-means, can work on high-dimensional data—but, like k-means, you can only graph example data in a two-dimensional plane, so keep your example simple. The first question you’ll tackle is: can you predict a person’s biological sex given only their height and weight?
The data for this example has been downloaded from a national longitudinal survey on people’s perception of their weight. Included in the data are the respondents’ height, weight, and gender. This is what the data looks like when graphed:

Just by looking at the preceding charted data, you can get a sense as to why KNN is so effective at evaluating clustered data. It’s true that there’s no neat boundary between male and female, but if you were to evaluate a new data point of a 200 pound, 72 inches-tall person, it’s clear that all the training data around that point is male and it’s likely your new point is male, too.
Conversely, a new respondent at 125 pounds and a height of 62 inches is well into the female area of the graph, though there are a couple of males with those characteristics as well. The middle of the graph, around 145 pounds and 65 inches tall, is the most ambiguous, with an even split of male and female training points. Expect the algorithm to be uncertain about the new points in that area. As there is no clear dividing line in this dataset, you would need more features or more dimensions to get a better resolution of the boundaries.
In any case, try out a few examples. Pick five points that you may expect to be definitely male, definitely female, probably male, probably female, and indeterminable. Add the following code to index.js, beneath the two import lines:
console.log("Testing height and weight with k=5");

console.log("==========================");


constsolver1 = new KNN(5, weight_height.data, weight_height.labels);


console.log("Testing a 'definitely male' point:");

console.log(solver1.predict([200, 75]));

console.log("\nTesting a 'probably male' point:");

console.log(solver1.predict([170, 70]));

console.log("\nTesting a 'totally uncertain' point:");

console.log(solver1.predict([140, 64]));

console.log("\nTesting a 'probably female' point:");

console.log(solver1.predict([130, 63]));

console.log("\nTesting a 'definitely female' point:");

console.log(solver1.predict([120, 60]));
Run yarn start from the command line and you should see the following output. Since the KNN is not stochastic that is it does not use any random conditions in its evaluation, you should see exactly the same output with the possible exception of the ordering of votes and their indexes, if two votes have the same distance.
If you get an error when you run yarn start, make sure that your data.js file has been correctly downloaded and installed.
Here’s the output from the preceding code:
Testing heightand weight withk=5

======================================================================


 Testing a'definitely male' point:

 { label: 'Male',

 voteCounts: { Male: 5 },

votes:

 [ { index: 372, distance: 0, label: 'Male' },

 { index: 256, distance: 1, label: 'Male' },

 { index: 291, distance: 1, label: 'Male' },

 { index: 236, distance: 2.8284271247461903, label: 'Male' },

 { index: 310, distance: 3, label: 'Male' } ] }


 Testing a'probably male' point:

 { label: 'Male',

 voteCounts: { Male: 5 },

votes:

 [ { index: 463, distance: 0, label: 'Male' },

 { index: 311, distance: 0, label: 'Male' },

 { index: 247, distance: 1, label: 'Male' },

 { index: 437, distance: 1, label: 'Male' },

 { index: 435, distance: 1, label: 'Male' } ] }


 Testing a'totally uncertain' point:

 { label: 'Male',

 voteCounts: { Male: 3, Female: 2 },

votes:

 [ { index: 329, distance: 0, label: 'Male' },

 { index: 465, distance: 0, label: 'Male' },

 { index: 386, distance: 0, label: 'Male' },

 { index: 126, distance: 0, label: 'Female' },

 { index: 174, distance: 1, label: 'Female' } ] }


 Testing a'probably female' point:

 { label: 'Female',

 voteCounts: { Female: 4, Male: 1 },

votes:

 [ { index: 186, distance: 0, label: 'Female' },

 { index: 90, distance: 0, label: 'Female' },

 { index: 330, distance: 0, label: 'Male' },

 { index: 51, distance: 1, label: 'Female' },

 { index: 96, distance: 1, label: 'Female' } ] }


 Testing a'definitely female' point:

 { label: 'Female',

 voteCounts: { Female: 5 },

votes:

 [ { index: 200, distance: 0, label: 'Female' },

 { index: 150, distance: 0, label: 'Female' },

 { index: 198, distance: 1, label: 'Female' },

 { index: 147, distance: 1, label: 'Female' },

 { index: 157, distance: 1, label: 'Female' } ] }
The algorithm has determined genders just as you would have done, visually, by looking at the chart. Feel free to play with this example more and experiment with different values of k to see how results might differ for any given test point.
If you found this article interesting, you can explore Burak Kanber’s Hands-on Machine Learning with JavaScript to gain hands-on knowledge on evaluating and implementing the right model, along with choosing from different JS libraries, such as NaturalNode, brain, harthur, and classifier to design smarter applications. This book is a definitive guide to creating an intelligent web application with the best of machine learning and JavaScript.
HTTP server applications with Node.js
In this tutorial we’ll learn about HTTP server applications and HTTP sniffing by David Herron, a software engineer in Silicon Valley, who has worked on various enterprise web application projects.
Launching a server with Node.js
Many scripts that you’ll run are server processes. Before you get started, you need to launch a simple HTTP server with Node.js. Borrow the simple server script on the Node.js home page (http://nodejs.org), and create a file named app.js containing the following:
const http = require('http');

http.createServer(function (req, res) {

  res.writeHead(200, {'Content-Type': 'text/plain'});

  res.end('Hello, World!\n');

}).listen(8124, '127.0.0.1');

console.log('Server running at http://127.0.0.1:8124');
Run it as follows:
$ node app.js

Server running at http://127.0.0.1:8124
This is the simplest of web servers you can build with Node.js. Now, visit http://127.0.0.1:8124 in your browser to see the Hello, World! message:

HTTP server applications
The HTTP server object is the foundation of all Node.js web applications. The object itself is very close to the HTTP protocol, and its use requires knowledge of that protocol. In most cases, you’ll be able to use an application framework such as Express that hides the HTTP protocol details, allowing you to focus on business logic.
The http.createServer function will create an http.Server object because it is an EventEmitter; this can be written in another way to make that fact explicit:
const http = require('http');

const server = http.createServer();

server.on('request',  (req, res) => {

  res.writeHead(200, {'Content-Type': 'text/plain'});

  res.end('Hello, World!\n');

});

server.listen(8124, '127.0.0.1');

console.log('Server running at http://127.0.0.1:8124');
The request event takes a function, which receives request and response objects. The request object has data from the web browser, while the response object is used to gather the data to be sent in the response. The listen function causes the server to start listening and arranging to dispatch an event for every request arriving from a web browser.
Creating a Node.Js Server
Now, here is something more interesting with different actions based on the URL. Create a new file, named server.js, containing the following code:
const http = require('http');

const util = require('util');

const url  = require('url');

const os   = require('os');

 const server = http.createServer();

server.on('request', (req, res) => {

    var requrl = url.parse(req.url, true);

    if (requrl.pathname === '/') {

        res.writeHead(200, {'Content-Type': 'text/html'});

        res.end(

`<html><head><title>Hello, world!</title></head>

<body><h1>Hello, world!</h1>

<p><a href='/osinfo'>OS Info</a></p>

</body></html>`);

    } else if (requrl.pathname === "/osinfo") {

        res.writeHead(200, {'Content-Type': 'text/html'});

        res.end(

`<html><head><title>Operating System Info</title></head>

<body><h1>Operating System Info</h1>

<table>

<tr><th>TMP Dir</th><td>${os.tmpdir()}</td></tr>

<tr><th>Host Name</th><td>${os.hostname()}</td></tr>

<tr><th>OS Type</th><td>${os.type()} ${os.platform()} ${os.arch()}

${os.release()}</td></tr>

<tr><th>Uptime</th><td>${os.uptime()} ${util.inspect(os.loadavg())}</td></tr> <tr><th>Memory</th><td>total: ${os.totalmem()} free: ${os.freemem()}</td></tr>

<tr><th>CPU's</th><td><pre>${util.inspect(os.cpus())}</pre></td></tr>

<tr><th>Network</th><td><pre>${util.inspect(os.networkInterfaces())}</pre></td></tr>

</table>

</body></html>`);

    } else {

        res.writeHead(404, {'Content-Type': 'text/plain'});

        res.end("bad URL "+ req.url);

    } });

 server.listen(8124); console.log('listening to http://localhost:8124');
To run it, type the following command:
$ node server.js

listening to http://localhost:8124
This application is meant to be similar to PHP’s sysinfo function. Node’s os module is consulted to provide information about the server. This example can easily be extended to gather other pieces of data about the server:

A central part of any web application is the method of routing requests to request handlers. The request object has several pieces of data attached to it, two of which are used for routing requests—the request.url and request.method fields.
In server.js, you can consult the request.url data to determine which page to show, after parsing (using url.parse) to ease the digestion process. In this case, you can do a simple comparison of the pathname to determine which handler method to use.
Some web applications care about the HTTP verb (GET, DELETE, POST, and so on) used and must consult the request.method field of the request object. For example, POST is frequently used for FORM submissions.
The pathname portion of the request URL is used to dispatch the request to the correct handler. While this routing method, based on simple string comparison, will work for a small application, it’ll quickly become unwieldy. Larger applications will use pattern matching to use part of the request URL to select the request handler function and other parts to extract request data out of the URL.
A search for a URL match in the npm repository turns up several promising packages that could be used to implement request matching and routing. A framework like Express has this capability already baked in and tested.
If the request URL is not recognized, the server sends back an error page using a 404 result code. The result code informs the browser about the status of the request, where a 200 code means everything is fine, and a 404 code means that the requested page doesn’t exist. There are, of course, many other HTTP response codes, each with their own meaning.
HTTP Sniffer – listening to the HTTP conversation
The events emitted by the HTTPServer object can be used for additional purposes beyond the immediate task of delivering a web application. The following code demonstrates a useful module that listens to all the HTTPServer events. It could be a useful debugging tool, which also demonstrates how HTTPServer objects operate.
Node.js’s HTTPServer object is an EventEmitter and the HTTP Sniffer simply listens to every server event, printing out information pertinent to each event. What you’re about to do is:
- Create a module, httpsniffer that prints information about HTTP requests.
- Add that module to the jsscript you just created.
- Rerun that server to view a trace of HTTP activity.
Create a file named httpsniffer.js containing the following code:
const util = require('util');

const url  = require('url');


const timestamp = () => { return new Date().toISOString(); }


exports.sniffOn = function(server) {

  server.on('request', (req, res) => {

    console.log(`${timestamp()} e_request`);

    console.log(`${timestamp()} ${reqToString(req)}`);

  });

  server.on('close', errno => { console.log(`${timestamp()} e_close

  ${errno}`); });

  server.on('checkContinue', (req, res) => {

    console.log(`${timestamp()} e_checkContinue`);

    console.log(`${timestamp()} ${reqToString(req)}`);

    res.writeContinue();

  });

  server.on('upgrade', (req, socket, head) => {

    console.log(`${timestamp()} e_upgrade`);

    console.log(`${timestamp()} ${reqToString(req)}`);

  });

  server.on('clientError', () => { console.log(`${timestamp()}

  e_clientError`); });

};


const reqToString = exports.reqToString = (req) => {

  var ret=`req ${req.method} ${req.httpVersion} ${req.url}` +'\n';

  ret += JSON.stringify(url.parse(req.url, true)) +'\n';

  var keys = Object.keys(req.headers);

  for (var i = 0, l = keys.length; i < l; i++) {

    var key = keys[i];

    ret += `${i} ${key}: ${req.headers[key]}` +'\n';

  }

  if (req.trailers) ret += util.inspect(req.trailers) +'\n';

  return ret;

};
Wow! That was a lot of code! However, the key to it is the sniffOn function. When given an HTTP Server object, it uses the .on function to attach listener functions that print data about each emitted event. It gives a fairly detailed trace of HTTP traffic on an application.
In order to use it, simply insert this code just before the listen function in server.js:
require('./httpsniffer').sniffOn(server);

server.listen(8124);

console.log('listening to http://localhost:8124');
With this in place, run the server you launched earlier. You can visit http://localhost:8124/ in your browser and see the following console output:
$ node server.js

listening to http://localhost:8124

2017-12-03T19:21:33.162Z request

2017-12-03T19:21:33.162Z request GET 1.1 /

{"protocol":null,"slashes":null,"auth":null,"host":null,"port":null,"hostname":null,"hash":null,"search":"","query":{},"pathname":"/","path":"/","href":"/"}

0 host: localhost:8124

1 upgrade-insecure-requests: 1

2 accept: text/html,application/xhtml+xml,application/xml;q=0.9,*/*;q=0.8

3 user-agent: Mozilla/5.0 (Macintosh; Intel Mac OS X 10_11_6) AppleWebKit/604.3.5 (KHTML, like Gecko) Version/11.0.1 Safari/604.3.5

4 accept-language: en-us

5 accept-encoding: gzip, deflate

6 connection: keep-alive

{}


2017-12-03T19:21:42.154Z request

2017-12-03T19:21:42.154Z request GET 1.1 /osinfo

{"protocol":null,"slashes":null,"auth":null,"host":null,"port":null,"hostname":null,"hash":null,"search":"","query":{},"pathname":"/osinfo","path":"/osinfo","href":"/osinfo"}

0 host: localhost:8124

1 connection: keep-alive

2 upgrade-insecure-requests: 1

3 accept: text/html,application/xhtml+xml,application/xml;q=0.9,*/*;q=0.8

4 user-agent: Mozilla/5.0 (Macintosh; Intel Mac OS X 10_11_6) AppleWebKit/604.3.5 (KHTML, like Gecko) Version/11.0.1 Safari/604.3.5

5 referer: http://localhost:8124/

6 accept-language: en-us

7 accept-encoding: gzip, deflate

{}
You now have a tool for snooping on HTTPServer events. This simple technique prints a detailed log of the event data. The pattern can be used for any EventEmitter object. You can use this technique as a way to inspect the actual behavior of EventEmitter objects in your program.
If you found this article helpful, you can explore David Herron’s Node.js Web Development – Fourth Edition to create real-time applications using Node.js 10, Docker, MySQL, MongoDB, and Socket.IO. With this practical guide, you can go beyond the developer’s laptop to cover live deployment, including HTTPS and hardened security.