Many people are confused by the difference between a Functional Component and a Pure Component. Most of them think that they are the same, but this is not true. When you use a React Pure Component, We need to import PureComponent from React:
import React, { PureComponent } from 'react';
If your React component’s render method is “pure” (that means it renders the same result, given the same props and state), you can use this function to improve the performance of your application. A Pure Component performs a shallow comparison for the props and nextProps objects as well as the state and nextState objects. Pure components do not include the shouldComponentUpdate(nextProps, nextState) method, and if you try to add it, you’ll get a warning from React.
![]()
In this article, you’ll learn to create a basic example to understand how Pure Components works. To begin, you need to install the Chrome extension React Developer Tools to do a simple debug in your application. Download React Developer Tools from https://chrome.google.com/webstore/detail/react-developer-tools/fmkadmapgofadopljbjfkapdkoienihi.
Building your React application
First, create your React application using create-react-app. Once that is done, you can proceed to create your first React component.
Before you install create-react-app, remember that you need to download and install Node from www.nodejs.org. You can install it for Mac, Linux, and Windows.
Install create-react-app globally by typing this command in your Terminal:
npm install -g create-react-app
Alternatively, you can use a shortcut:
npm i -g create-react-app
Now build your first React application by following these steps:
- Create your React application with the following command:
create-react-app my-first-react-app
- Go to the new application with cd my-first-react-appand start it with npm start.
- The application should now be running at http://localhost:3000.
- Create a new file called js inside your src folder:
import React, { Component } from 'react';


class Home extends Component {

render() {

return <h1>I'm Home Component</h1>;

  }

}


export default Home;
File: src/Home.js
- You may have noticed that you are exporting your class component at the end of the file, but it’s fine to export it directly on the class declaration, like this:
import React, { Component } from 'react';

    export default class Home extends Component {

render() {

return<h1>I'm Home Component</h1>;

      }

    }
File: src/Home.js
- Now that you have created the first component, you need to render it. So, open the jsfile, import the Home component, and add it to the render method of the App component. If you are opening this file for the first time, you’ll probably see a code like this:
import React, { Component } from 'react';

import logo from './logo.svg';

import './App.css';

class App extends Component {

render() {

return (
 Welcome to React
);
}
}
export default App;
To get started, edit src/App.js and save to reload.
File: src/App.js
- Now change this code a bit. You need to import your Home component and then add it to the JSX. You also need to replace the <p> element with your component, like this:
import React, { Component } from 'react';

import logo from './logo.svg';


// We import our Home component here...

import Home from './Home';

import './App.css';

class App extends Component {

render() {

return (

Welcome to React
{/* Here we add our Home component to be render it */}

);} } export default App;
File: src/components/App.js
- Now, create the Numbers component:
// Dependencies

import React, { Component } from 'react';
// Components
import Result from './Result';

// Styles

import './Numbers.css';


class Numbers extends Component {

state = {

numbers: '', // Here we will save the input value

results: [] // In this state we will save the results of the sums

};

handleNumberChange = e => {

const { target: { value } } = e;


// Converting the string value to array

// "12345" => ["1", "2", "3", "4", "5"]

const numbers = Array.from(value);

// Summing all numbers from the array

 // ["1", "2", "3", "4", "5"] => 15

const result = numbers.reduce((a, b) => Number(a) + Number(b), 0);


// Updating the local state

this.setState({

numbers: value,

results: [...this.state.results, result]

});
}

render() {
return (
  {/* Rendering the results array */}
              {this.state.results.map((result, i) => (                               ))}

)       }     }   export default Numbers;
File: src/components/Numbers/Numbers.js
- Then, create the Result component (as a Class Component):
import React, { Component } from 'react';


class Result extends Component {

render() {

return<li>{this.props.result}</li>;

      }

    }


 export default Result;
File: src/components/Numbers/Result.js
- Finally, create the styles:
.Numbers {

      padding: 30px;

    }

.Numbers input[type=number]::-webkit-inner-spin-button,

    .Numbers input[type=number]::-webkit-outer-spin-button {

      -webkit-appearance: none;

      margin: 0;

    }


 .Numbers input {

      width: 500px;

      height: 60px;

      font-size: 20px;

      outline: none;

      border: 1px solid #ccc;

      padding: 10px;

    }


.Numbers ul {

      margin: 0 auto;

      padding: 0;

      list-style: none;

      width: 522px;

    }


 .Numbers ul li {

      border-top: 1px solid #ccc;

      border-left: 1px solid #ccc;

      border-right: 1px solid #ccc;

      padding: 10px;

    }


.Numbers ul li:first-child {

      border-top: none;

    }


.Numbers ul li:last-child {

      border-bottom: 1px solid #ccc;

    }
File: src/components/Numbers/Numbers.css
How React Pure Component works…
If you run the application, you will see this:

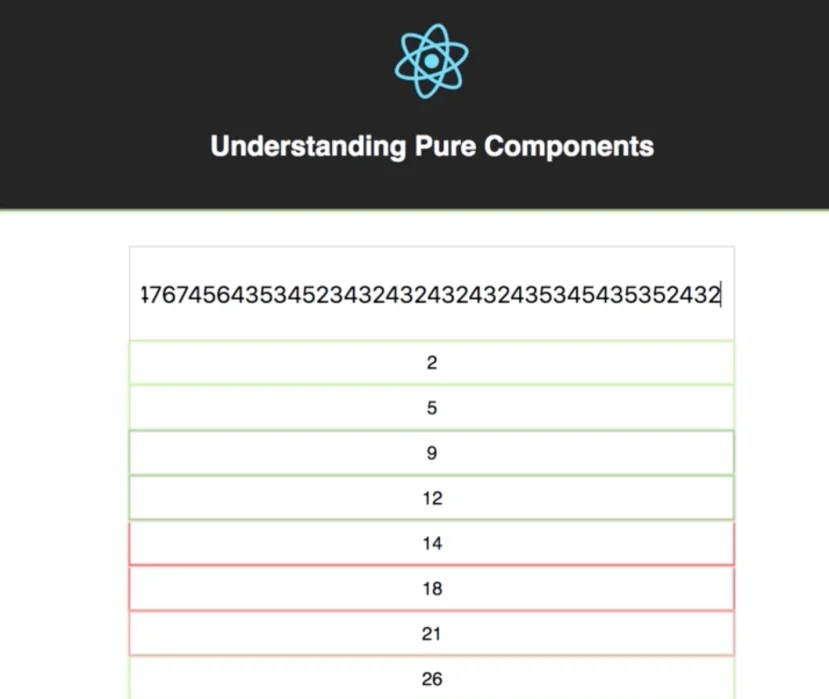
- You have used an input with the number type, which means you’ll only accept numbers if you start writing numbers (1, then 2, then 3, and such). You will see the results of the sum on each row (0 + 1 = 1, 1 + 2 = 3, 3 + 3 = 6):

Now, inspect the application using React Developer Tools. You need to enable the Highlight Updates option:

After this, start writing multiple numbers in the input (quickly), and you will see all the renders that React is performing:

As you can see, React is doing a lot of renderings. When the highlights are red, it means the performance of that component is not good. Here’s when React Pure Components will help you. Migrate your Result component to be a Pure Component:
import React, { PureComponent } from 'react';


class Result extendsPureComponent {

render() {

return <li>{this.props.result}</li>;

      }

    }


   export default Result;
File: src/components/Numbers/Result.js
Now if you try to do the same with the numbers, see the difference:

With the Pure Component React, you do less renders in comparison to a Class Component. Probably, you may now think that if you use a Stateless component instead of a Pure Component, the result will be the same. Unfortunately, this won’t happen. If you want to verify this, change the Result component again and convert it into a Functional Component.:
import React from 'react';


const Result = props => <li>{props.result}</li>;


 export default Result;
File: src/components/Numbers/Result.js
See what happens with the renders:
As you can see, the result is the same as the Class Component. This means that using a Stateless Component will not help you improve the performance of your application all the time. If you have components that you consider are pure, consider converting them into Pure components.
If you found this article interesting, you can explore Carlos Santana Roldan’s React Cookbook to be on the road to becoming a React expert. React Cookbook has over 66 hands-on recipes that cover UI development, animations, component architecture, routing, databases, testing, and debugging with React.